 Using a Digital Still Camera
Canon Powershot SD 1100 IS Manual (pdf) Featured here with settings below.
Note -
your specific camera may not use exact same settings or terms.
There are now so many digital cameras
on the market and at schools that make it impossible to go through the
specific features of every camera. Here are some essential basics to
follow no matter the camera or make.
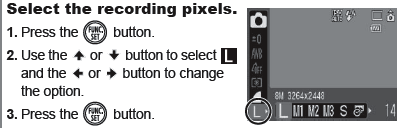
1. Resolution Settings of your camera
- "Why is my PowerPoint so slow?"
- "Why is grandma trying to send me 10mg photos to my email?"
- " How come when I open my photo on my computer, I get a close up of the person's right nostril?"
| Camera Setting | Megapixels | Image Dimension | Purpose |
| L (large) | 8M | 3264 x 2448 | 11x 17 prints |
| M1 (medium 1) | 5M | 2592 x 1944 | 8 x 10 prints |
| M2 (medium 2) | 3M | 2048 x 1356 | 5 x 7 prints |
| M3 (medium 3) | 2M | 1600 x 1200 | 4 x 6 prints |
| S (small) | 0.03M | 640 x 480 | computer/web images |
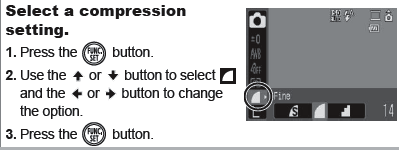
2. Compression Settings of your camera
Along with image dimension, the compression setting will determine the file size of a digital photo.
| Compression Settings | Quality | File Size for 640 x 480 |
Superfine  | High | 249 KB |
Fine  | Normal | 150KB |
Normal  | Lower | 84B |
3. The Essential Camera Controls to Know
a. Mode Switch
- Camera Mode (Camera symbol) - take pictures
- Movie Mode (Video camera symbol) - not recommended unless needing video for 10-30 seconds, otherwise buy a pocket video camera.
- Play Mode (right triangle symbol)- view pictures
- Flash ON/OFF (lightning bolt symbol) - made for all SD Charger fans!)
- Flash is ON if there no circle around the lightning bolt
- Flash is OFF if there is a circle around the lightning bolt
- Trash Can - When set to Play Mode you can erase that one photo
- Flower (macro - close up) / Mountain (infinity - farther back from subject)
- Erase All
- This allows you to wipe out all your pictures in one easy step. This
is important for cameras being
checked out by different classrooms, as
the teacher needs to Format the camera after loading pictures onto a computer and before returning the camera. For the Canon SD 1100 it is found in Play mode/Erase/Scroll Down to All Images/Select OK.
d. Menu - In Camera Mode
- Red Eye Correction - this varies from camera to camera, you will have to open the manual on this one but is directly related to using the flash. For the Canon SD 1100 it is found in Camera mode/Menu/Flash Settings/Red Eye Correction On and Red Eye Lamp On.

Collaborative Learning Spaces in 21st Century Learning Environments | Copyright © 2012. All rights reserved.